Maintenance
How-To
Walk-In Coolers
How to Replace Your Walk-In Cooler or Freezer Gasket
The $50 fix that could save you thousands — and the step-by-step guide to doing it right.
Here’s a scenario that probably sounds familiar. Your walk-in cooler is running nonstop. The energy bill creeps up. There’s a thin line of frost forming around the door frame. Your staff is pulling a little harder on that door to get it closed. And then one day, your health inspector walks in and points at the door seal with a concerned look.
All of this might be caused by one humble strip of rubber or vinyl that wraps around your walk-in door. The door gasket.
A bad gasket is like a crack in a dam. It seems minor until the water finds it. And by the time you notice the flood, the damage is already done.
The good news? Replacing a walk-in cooler or freezer door gasket is one of the most manageable, cost-effective maintenance tasks you can do. No refrigeration license required. Just the right gasket, the right technique, and about an hour of your time.
This guide — from Strivide, the manufacturing brand behind Gasketopia — walks you through everything: how to know when your gasket is dying, how to measure correctly, how to remove the old one, install the new one, and keep it healthy long-term. We’ve been manufacturing replacement gaskets for over 30 years. Let’s get into it.
Part 1: Why the Gasket Is the Unsung Hero of Your Walk-In
Most people only think about their gasket when it’s already failing. That’s like only thinking about your tire when it blows out on the highway.
Think of your refrigeration system as a team. The compressor is the quarterback — powerful, expensive, high-profile. The gasket is the offensive lineman — nobody notices him when he’s doing his job, but the whole play falls apart the moment he steps aside. Your compressor is working against whatever leak your gasket allows. Cold air out means warm air in, which means the compressor runs longer cycles, higher electricity consumption, more wear on expensive components, and a shorter equipment lifespan.

Part 2: The 7 Signs Your Gasket Needs Replacing
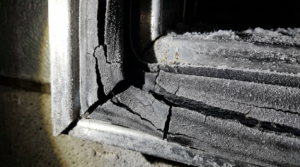
1. Visible Cracks, Tears, or Brittleness
Run your hand along the gasket. Is the material cracked, stiff, hardened, or splitting at corners? If it looks rough, it’s not sealing well.
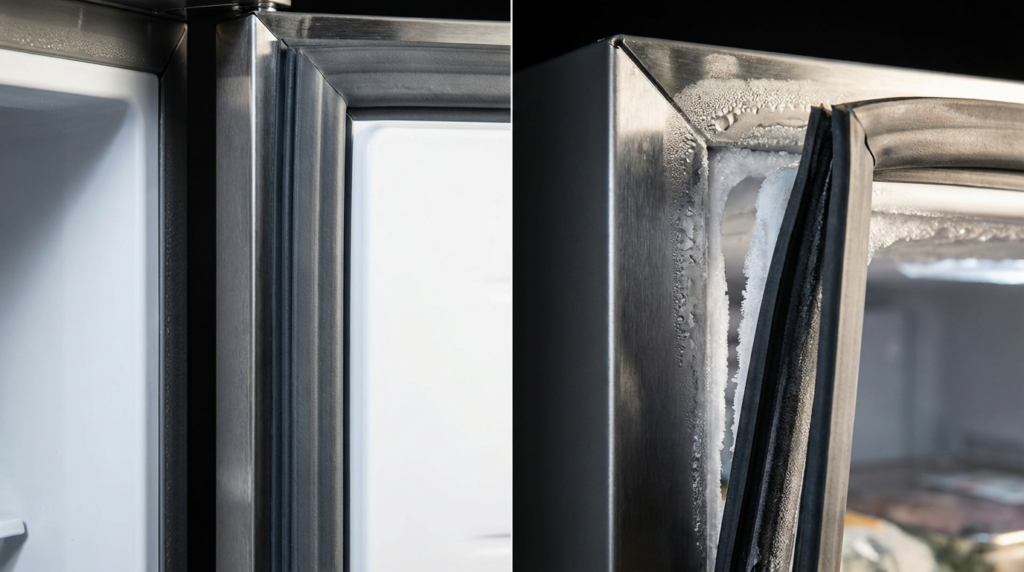
2. Frost or Ice Buildup Around the Door Frame
Frost forming along the door frame is not normal. It means warm, moist air is getting in and freezing on contact. If you’re defrosting that frost more than once a week, the gasket is the first thing to check.
3. Condensation on the Door Exterior
Moisture on the outside of the door in a consistent pattern around the perimeter is a classic sign of a compromised seal.
4. The Door Doesn’t Close Easily
If staff are fighting the door, leaving it slightly ajar, or if magnetic gaskets aren’t snapping shut the way they used to, the gasket has lost its shape or magnetic strength.
5. Your Energy Bill Crept Up Without Explanation
If energy consumption has risen without adding new equipment, a leaking gasket is a prime suspect. The compressor is compensating by running longer and harder.
6. The Dollar Bill Test Fails
Close the door on a dollar bill so it’s pinched between the gasket and the door frame. Try to pull it out — it should resist firmly. If it slides out easily, you have a leak. Run this test at the top, both sides, and the bottom.

7. Mold or Grime in the Gasket Folds
A little cleaning is normal. But if mold keeps coming back after regular cleaning, the gasket material itself has been compromised. You can clean it, but you can’t fix it.
Part 3: Know Your Gasket Before You Order
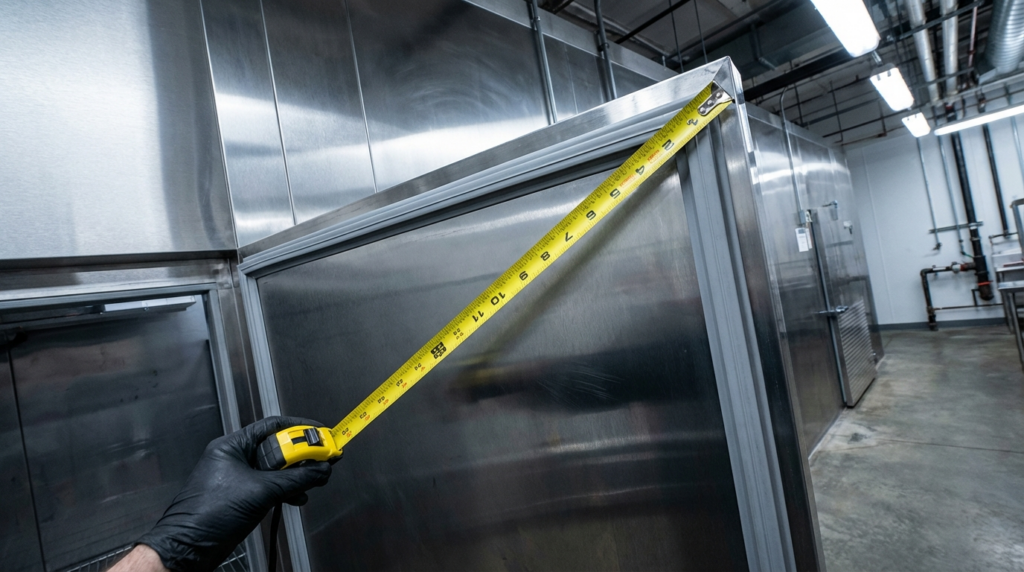
1. The Dimensions
Measure your gasket from outside corner to outside corner — both height and width. Do not measure the door opening. Measure the gasket itself. When in doubt, measure in multiple places.
2. The Mounting Style
- Snap-in / Dart: Most common on newer equipment. An arrow-shaped “dart” snaps into a channel groove in the door. No screws needed.
- Screw-in: Held by screws and a retaining strip. Requires a screwdriver to install and remove.
- Push-in: Similar to dart but compresses directly into the channel groove without the arrow profile.
Also check whether it’s magnetic. Magnetic gaskets snap the door closed when the door gets within an inch of the frame.
3. The Manufacturer and Model
Look for the manufacturer tag in the door jamb or on the inner frame. At Gasketopia, we manufacture custom-fit replacement gaskets for all major walk-in brands. Even if your unit is old or obscure, send us the measurements and we’ll build it to fit.
Part 4: What You’ll Need
- Your new replacement gasket (custom-fit from Gasketopia/Strivide)
- Phillips screwdriver or hex wrench (for screw-in gaskets)
- Rubber mallet
- Mild dish soap and warm water
- Clean rags or microfiber cloths
- Hairdryer or basin of hot water (to warm the gasket)
- Protective gloves (door edges can be sharp)

Part 5: Step-by-Step Replacement Guide
Step 1: Warm the New Gasket
Before you touch the old gasket, soak the new one in warm water for 5–10 minutes, or use a hairdryer on low heat. A stiff, cold gasket is fighting you the whole time. A warm, flexible gasket practically installs itself.
Step 2: Remove the Old Gasket
Snap-in/dart gaskets: Start at a bottom corner. Grip the gasket and pull outward — the dart will release from its channel. Work the sides first, then the top. Check for any corner screws before pulling.
Screw-in gaskets: Remove every screw along the retaining strip before pulling the gasket free. Keep the screws — you’ll need them for the new installation.
Step 3: Clean the Channel
With the old gasket out, use warm soapy water and a rag or small stiff brush to remove accumulated grime, old adhesive, mold residue, and food bits. Rinse well and dry completely. Any debris left behind prevents proper seating and creates micro-gaps.

Step 4: Install the New Gasket
Always start at a top corner. For snap-in/dart gaskets:
- Press the dart firmly into the groove at one top corner.
- Using a rubber mallet, tap the dart into place along the top edge toward the other corner.
- Move down both sides simultaneously, tapping as you go.
- Finish at the bottom, connecting the two sides.
- Go back around with the mallet and fully seat any raised sections.
For screw-in gaskets: Position the gasket and retaining strip, insert all screws loosely around the full perimeter, then tighten firmly in sequence. Don’t overtighten — it will deform the gasket.
Step 5: Check the Seal
Do the dollar bill test at multiple points around the entire perimeter. Every point should grip the bill firmly. Pay special attention to corners. If any point fails, inspect the gasket there — the dart may not be fully seated or there may be debris underneath.
Step 6: Monitor for 24–48 Hours
A properly installed gasket should produce noticeable results quickly. Frost buildup at the frame — if caused by the old gasket — should stop within one defrost cycle. Watch for smoother, more stable internal temperature readings.
Part 6: How to Make Your New Gasket Last
- Clean monthly: Warm, soapy water and a soft cloth. Avoid bleach and abrasive cleaners — they degrade the material faster.
- Inspect quarterly: Do the dollar bill test every three months. Catching a problem early is always cheaper than a crisis.
- Train your staff: The most common cause of premature failure is impact damage — carts, pulling the door at the bottom, letting it slam. A five-minute training moment can double your gasket lifespan.
- Check door alignment: Loose or damaged hinges cause uneven wear no matter how good the gasket is. Include hinge inspection in regular maintenance.
- Petroleum jelly for minor issues: A thin coat on the contact surface can temporarily restore a slightly stiff section while you order a replacement. Stop-gap only, not a fix.
Part 7: Custom-Fit vs. Universal — Why It Matters
Here’s something the competition doesn’t always tell you: “universal fit” is often a polite fiction. Walk-in doors are manufactured to precise specifications — profile dimensions, dart channel depth, corner radius, offset. A universal gasket might sit in the channel, but sitting in and sealing properly are not the same thing.
“Custom-fit” isn’t a marketing phrase. It’s the difference between a gasket that seals and one that merely occupies the channel where a gasket should be.
Strivide manufactures replacement gaskets to order. You give us your door dimensions, mounting style, and operating temperature requirements — we produce a gasket that fits your door. Not approximately. Exactly.
For extreme low-temperature applications below 0°F, standard vinyl stiffens significantly. We offer low-temperature flexible vinyl options rated to -40°F for deep-freeze and blast freezer applications.
Part 8: When to Call a Pro
- Multiple failed installations: If the seal still fails after a correct installation, you likely have a door alignment problem. Have a technician check hinge tension and door squareness before replacing the gasket again.
- Recurring failures: Replaced gaskets more than twice in quick succession? Something is causing premature failure — chemical exposure, thermal cycling, or a structural door issue.
- Temperature instability persists after replacement: Failing door heater strips, refrigerant issues, or a struggling compressor can produce symptoms that look like a gasket problem.
- High-volume facilities: If downtime is costly, professional installation with infrared temperature verification is worth the investment.
Frequently Asked Questions
How often should I replace my walk-in cooler gasket?
Plan for replacement every 3–5 years under normal commercial use. High-traffic walk-ins or harsh chemical exposure shortens that. Don’t wait for failure — schedule proactive replacement.
Can I repair a gasket instead of replacing it?
Minor compression loss can be temporarily addressed with petroleum jelly. Cracks, tears, stiffening, and mold cannot be repaired — they require replacement. Patch repairs generally don’t hold under commercial refrigeration conditions.
My door is no longer manufactured. Can I still get a gasket?
Yes — this is exactly what Strivide specializes in. We manufacture custom gaskets from your measurements, not from a parts catalog. Send us your dimensions at thegasketopia.com.
My new gasket was installed correctly but the door still won’t seal. What’s wrong?
Check your door hinges, door closer tension, and door alignment. Approximately half the time when a properly installed gasket fails to seal, it’s a door alignment issue — not the gasket. Have a technician check before concluding the gasket is defective.
Need a custom-fit replacement gasket? Strivide by Gasketopia has you covered.
Built to your exact dimensions. Shipped fast. 30+ years of manufacturing experience.
Visit thegasketopia.com to order or get a custom quote.
About Strivide / Gasketopia — Strivide is the manufacturing brand behind Gasketopia.com, a specialized destination for walk-in cooler and freezer replacement gaskets. Operating under RAC Industries LLC, we serve commercial food service, cold storage, and industrial refrigeration operators across the United States.